
Results 1 to 9 of 9
 14Likes
Thread: Tutorial: Casting Resin Scales
 LinkBack URL
 About LinkBacks
-
08-27-2012, 05:45 AM #1all your razor are belong to us


- Join Date
- Sep 2009
- Location
- Fresno, CA
- Posts
- 1,368
Thanked: 446 Tutorial: Casting Resin Scales
By request, I'm posting how I cast up some resin scales.
Part I: Making a Mold
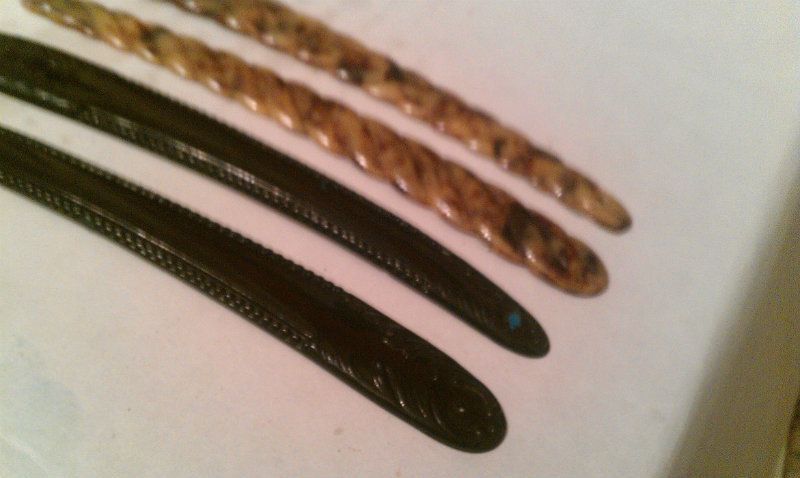
The first thing to do is to find some nice donor scales. The ideal scales don't have warps since every copy you make will also have the same warp. Here's mine:
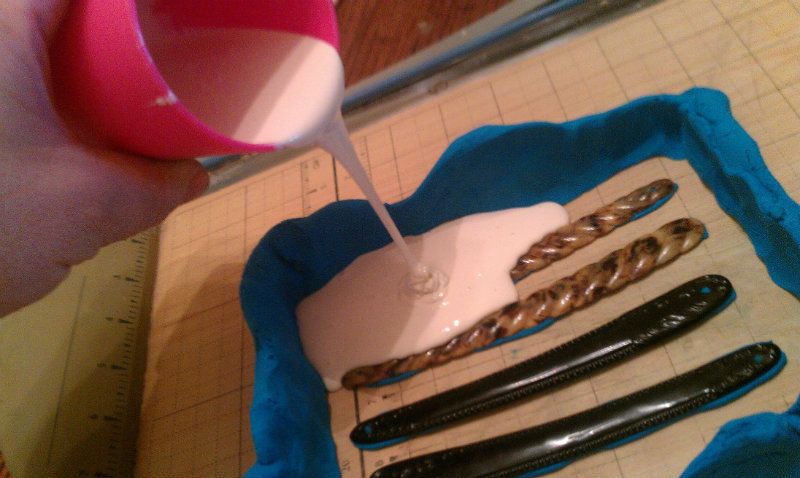
The next thing we need to do is to seal the scales to a flat surface. Ideally, you'll want to use a hot glue gun, but you risk breaking your scales when you're retrieving your originals. Here, I've used the included modeling clay in the Alumilite Super Casting Kit. I used a bit of clay on the bottoms of the scales and mounted them to my flat surface and then used the remaining clay to build walls around my project. My daughter wanted me to cast up one of her little toys at the same time, but since I was running low on silicone rubber material, I had to pull the toy out of the final.

For this project, I'm using RTV (room temperature vulcanizing) silicone rubber to make my mold. It comes in two parts...a base and catalyst.

I mixed up four ounces of the RTV into a third cup and SLOWLY began to pour up the mold. Going too fast will allow bubbles to get trapped in your mold and at that point, you'll have to start over or you'll have to do some blending and sanding with each pour.

From here, you need to walk away for about eight hours to let the RTV do its thing. When the RTV is good and solid, carefully take off your retaining walls, trim the edges, and clean up. One thing worth mentioning is that your new mold has to carefully examined for undercuts that can trap air in your pours. These can be carefully removed using a sharp knife.
My finished mold:

That's it, you are now ready to start casting your own duplicate scales.
Part II will cover the rest and will be posted a bit later...
-
The Following 13 Users Say Thank You to red96ta For This Useful Post:
baldy (08-27-2012), BobH (08-27-2012), Cangooner (08-27-2012), Chevhead (04-05-2013), dinnermint (07-05-2016), Geezer (12-08-2012), Hirlau (02-19-2016), HNSB (08-27-2012), onimaru55 (08-27-2012), shutterbug (08-27-2012), spazola (08-27-2012), str8fencer (08-27-2012), WhiteLion (12-10-2012)
-
08-27-2012, 06:01 AM #2This is not my actual head.


- Join Date
- Nov 2009
- Location
- Middle of nowhere, Minnesota
- Posts
- 4,623
- Blog Entries
- 2
Thanked: 1371
I've made a few silicone molds for scales. I am very interested to see part II, as I have had problems with the finished scales from the molds, and have been considering an injection or vacuum process.
One other thing that I'd add here is that the scales used for the molds should be perfect - not just warp free. Even small scratches or dings in the scales will come out in the mold.
Strange women lying in ponds distributing swords is no basis for a system of government.
-
The Following 2 Users Say Thank You to HNSB For This Useful Post:
cudarunner (08-27-2012), Geezer (12-08-2012)
-
08-27-2012, 06:26 AM #3Member
- Join Date
- Sep 2011
- Location
- Stockton, CA
- Posts
- 58
Thanked: 10
Are you using any type of mould release agent when creating the moulds?
-Xander
-
08-27-2012, 06:28 AM #4all your razor are belong to us
- Join Date
- Sep 2009
- Location
- Fresno, CA
- Posts
- 1,368
Thanked: 446
Part II: Making New Scales
I've got everything set out for casting of new scales. Items needed are the casting resin, mixing stick, coloring agent, and three cups.

I microwave the mold for one minute to warm it up. Apparently, it helps the resin. While the mold is warming up, I pour equal part of A and B and set them aside.

This is where things get kinda fast. Once the A and B are mixed, I've only got about 45 seconds to get it mixed and poured before it begins to cure...heck, it's solid in under 3 minutes and the demold time is about ten minutes. Here is a pic of the resin poured and already beginning to cure. It's mixed as an amber color but flashes over to a nice light off-white color.
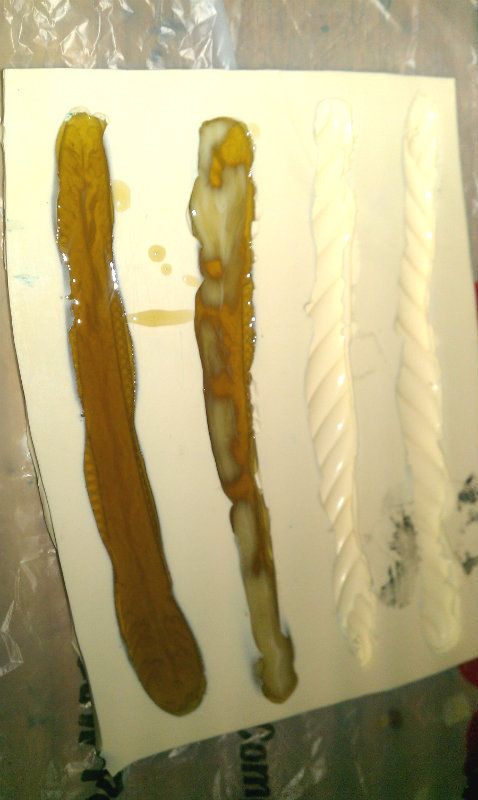
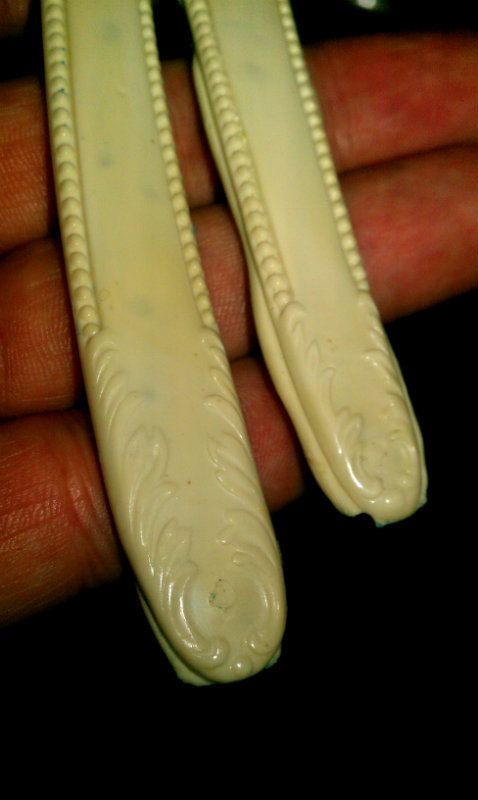
After ten minutes, you can carefully demold the scales and finish them. The come out like pieces of a model airplane and will have to be sanded and finished. This pour had some error in it and left me with a couple color splotches. It's either a bit of moisture or residual color that I missed from earlier when I was casting some black scales. Either way, I'll probably have to pick up some new mixing cups at work tomorrow to insure that the splotching doesn't happen again.
-
-
08-27-2012, 06:32 AM #5all your razor are belong to us
- Join Date
- Sep 2009
- Location
- Fresno, CA
- Posts
- 1,368
Thanked: 446
No. I would use mold release if I were to be making a two-part mold, but since this a one-piece mold, I don't need it. The RTV doesn't bond with anything other than itself. Originally Posted by fast14riot

-
08-27-2012, 07:04 AM #6Member

- Join Date
- Apr 2011
- Location
- Brisbane, Australia
- Posts
- 1,434
Thanked: 642 Tutorial: Casting Resin Scales
Great thread. Thanks. Really interesting.
Stu
-
08-27-2012, 03:06 PM #7Senior Member

- Join Date
- Sep 2009
- Location
- Guthrie, Oklahoma
- Posts
- 419
Thanked: 217
Thank you *very* much for this tutorial.
It looks like you're having a lot of fun with this process, and having great sucess with it as well.
Keep it up!!
-
09-02-2012, 12:21 AM #8Member

- Join Date
- Jun 2012
- Location
- Las Cruces, NM
- Posts
- 62
Thanked: 10
Wow!
Looks like you could be in the "Scale business"!
Pretty awsome, thanks for sharing.
-
01-19-2013, 01:43 AM #9Senior Member
- Join Date
- Apr 2012
- Location
- Jersey City
- Posts
- 225
Thanked: 50
I like your work. Interested in trying it myself.
I checked on the Aluminite website. It appears that you are using Aluminite regular with a pot life of 90 seconds. Is there a reason you used that rather than Performance 80D or 65D? They have a longer pot time. Tensile strenght? Shore hardness?
Any help would be appreciated.


 Reply With Quote