
Results 1 to 10 of 45
 4Likes
 LinkBack URL
 About LinkBacks
-
06-19-2009, 03:47 AM #1< Banned User >

- Join Date
- Apr 2008
- Location
- Newtown, CT
- Posts
- 2,153
Thanked: 586 How to do Chip Inlays; The Icedog Method
How to do Chip Inlays; The Icedog Method
Hey kids! Last month I posted this thread: http://straightrazorpalace.com/works...my-knives.html showing a knife from my collection I had customized. In that thread I promised to teach how I did the turquoise inlays on the custom scales I fashioned. Over the past twenty years I have developed and proven this method for putting inlays in substrates of wood, hard plastics, bone, horn, even metals. I have taught the process to several artists who have used it with fantabulous results. One furniture maker has made some pretty fancy pieces and some equally fancy cash on the sales of those pieces he inlayed using my technique. I hope some of you will try this method on projects of your own. While the results appear difficult and expensive, you may be surprised to find the process remarkably simple and gratifying.
Substrate Materials
Once you see the “big picture” you will understand why my method is suitable to produce inlays of any shape, color or size from very simple to ornate and detailed in the surface of practically any rigid material. You are limited only by your imagination and the laws of physics. As I did on the knife discussed in the above referenced thread, for this lesson I will be demonstrating on a piece of spalted apple wood:
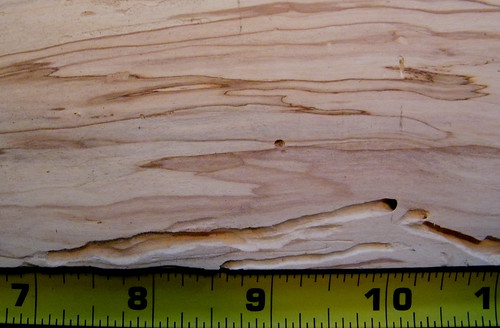
Apple wood is typically bone white with deep brown heart wood. The grain is very tight and the wood when dry is rock hard. This particular bit of wood is highly figured because of “spalting” which is the fungal spores reacting with the sugars in the tree’s sap as they spread through the grain lines, eating the wood. Ya just gotta admire the power of nature and her ability to produce striking beauty even as she causes the destruction of a material as it rots away. You can find spalting in all types of wood but I believe the spalted wood of fruit trees is the prettiest because of the high sugar content in the saps. Happy spores are pretty spores! But this article isn’t about spalted wood. In the photo notice this wood is also “wormy”. It is those worm holes I will be inlaying. If I wanted to create my own design I would cut recesses to be inlayed with carving gouges or an electric rotary (Dremel) type machine.
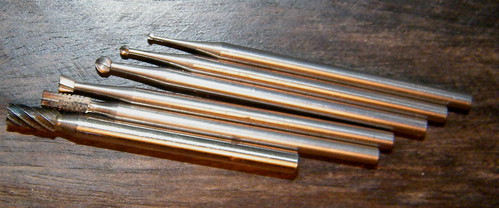
This is a small sample of the vast array of burrs and end mills available to use for this process. Once you have designed your project you will easily decide which bit will best suit your purpose.
Inlay Materials
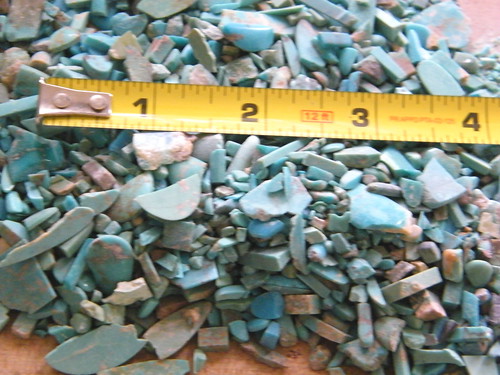
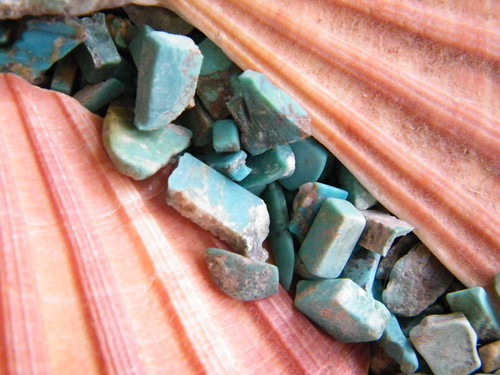
This is scrap turquoise. The operative word here is SCRAP.Notice the variety shapes finishes, colors and sizes of the turquoise chips. Anyone who is designing and fabricating projects utilizing turquoise will be generating scrap. Again look at the photo. There are pieces that were finished cabochons that broke during installation. There are also bits that are cut offs from much larger stones. Observe too the varied patterns and colors of the impurities (known as “matrix”) in the stones. This works to our advantage because it is yet another complexity that causes some stuff to be scrapped. While you can go to jeweler’s supply houses like Sleeping Beauty or Rio Grande and pay exorbitant prices for very nice materials, it is much more fun and frugal to shop around by walking into the studios of artists who are using quantities of turquoise, especially in the American southwest.
While on a business trip to Albuquerque, New Mexico I walked into the shop of a very prolific producer of silver and turquoise jewelry. When asked if he had any bits of scrap left over from his processes, he led me to a standard size three drawer horizontal file cabinet. He showed me all three drawers neatly packed full of bags of the very chips you see in the photo. I left the shop with ten pounds of turquoise in five zip-lock bags in exchange for a twenty dollar bill!
I will talk about other suitable materials a little later but first I want you to understand my process.
The Process
I am going to fill the worm holes with a blended paste of epoxy and turquoise so I the chips you see above are clearly too big. It is an easy task to pulverize turquoise into any size from smaller chips down to fine dust.
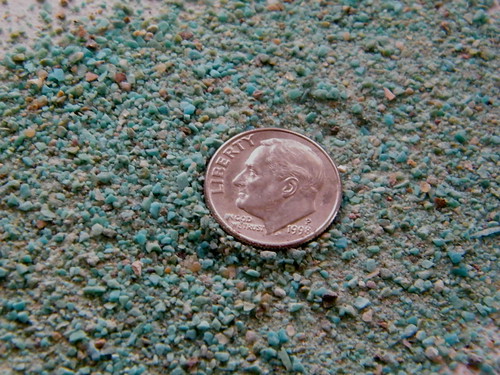
This is actually “shake” I separated from the bigger stuff by using a kitchen sieve. However you can crush turquoise by putting it between two sheets of steel (even large handsaw blades) and pounding with a hammer or you can quickly do it with an electric burr type coffee mill or spice grinder. I have a small Cuisinart food processor that I use for the job. As the blade is shot for anything but pulverization and the inside of the bowl has been severely stone blasted, it can never be used again for its original intended purpose (in sincere hopes to maintain domestic harmony I keep it well hidden from my girlfriend Scarlett, the machine’s original owner). Some projects (which I will show you in a little while) will use a combination of small and large chips. But in this lesson we are using what I’ve already showed you. We will be mixing it into a stiff paste with epoxy.
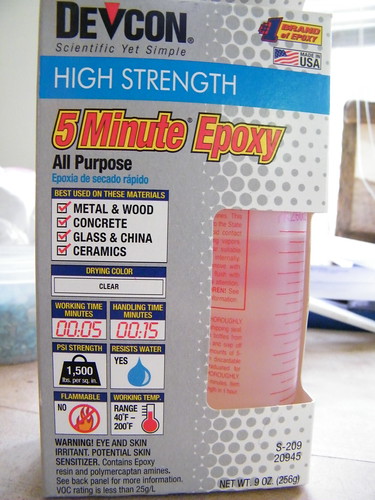
I use this Devcon High Strength 5 Minute Epoxy. I have a long history of work in both aerospace and the medical device industries. I have tested my process with every epoxy I have come across and (fortunately) none exhibited better results than this stuff you see right here. The goals for this application are three:
- The cured epoxy must be hard and rigid so it can be polished.
- It should be colorless.
- It should bond to wood.
I mix in the bottom inch or so of a paper cup. This product is mixed with equal parts A and B. Then add an amount of crushed turquoise approximately equal to the mixed epoxy.

Be sure to have your substrate ready to receive the inlay before mixing the epoxy. The stuff doesn’t cure instantaneously but you don’t have all day either! Once the glue kicks you can do no more with it.
To be Continued!
BradLast edited by icedog; 06-19-2009 at 03:52 AM.
Entasis likes this.
-
-
06-19-2009, 03:49 AM #2< Banned User >
- Join Date
- Apr 2008
- Location
- Newtown, CT
- Posts
- 2,153
Thanked: 586
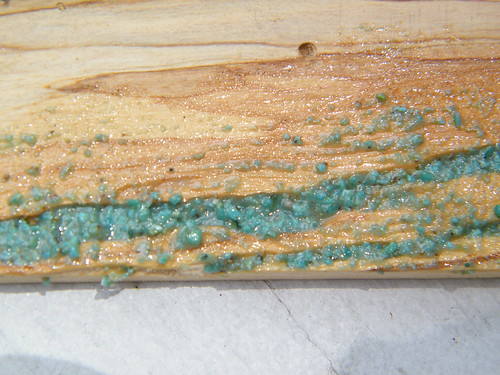
Apply the mix to your recess with much manipulation. Press and work it in applying force is all directions. If the recess goes completely through the substrate, check the back to ensure the mix is coming out the bottom of the hole. In the above photo, you can see the edge of the recess. This means we arent done. The paste must be applied liberally so that it is piled over the edge of the recess, overfilling the slot.
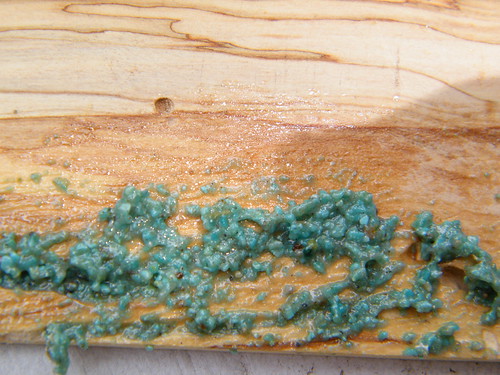
I always set the mixing cup, stick and leftover mix aside as a witness sample. What this means is that I use the leftover portion as an indicator to let me know when the inlay material is cured enough to begin sanding.
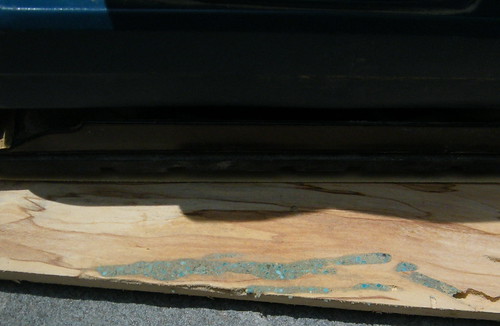
So heres the inlay sanded flush with 100 grit sandpaper. It took about three minutes. I wont go through the rest of the sanding but you should know the progression. I start with 100 unless I am using larger stones then Ill start with 80 grit. The full progression will be 80, 100, 120, 150, 180, 220, 320, 400, and 600 and so on until you can polish with a wheel. Here are a few samples I have done using this method and the same materials.

This ebony box with turquoise inlay is called Djembe. I made it as a Christmas gift for Scarlett four years ago. I dug the recesses for the inlays. Can you dig that?

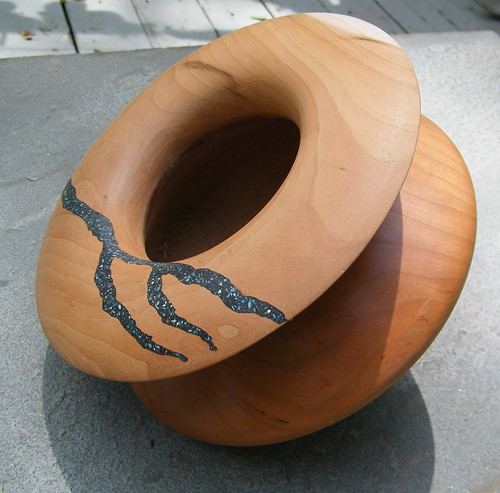
This is a very different application of the same process. It was used as a repair when the wide rim broke on this ridiculously challenging bowl I turned in cherry. Now the crack on the underside is no big deal but using black epoxy with a lighter portion of turquoise I was able to successfully hide the crack. Looky here:
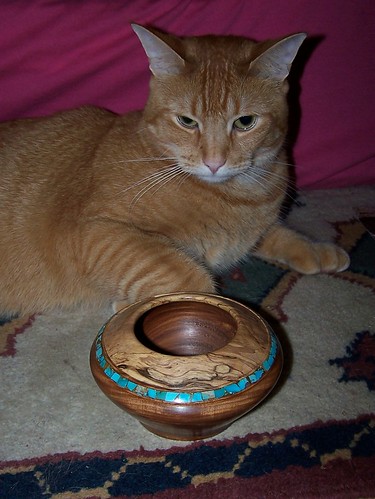
Here is Mr. Toes with a bowl titled Alamogordo. The bowl is Bolivian rosewood, that spalted apple again and a band of turquoise. This time I used larger stones which I set individually then filled the interstitial spaces with smaller fragments. Very much like a jigsaw puzzle, I found the bits that were the most comfortable in every available space. The finished piece looks to some like I may have actually thought about it:
To be Continued,
Brad
-
The Following 11 Users Say Thank You to icedog For This Useful Post:
-
06-19-2009, 03:50 AM #3< Banned User >
- Join Date
- Apr 2008
- Location
- Newtown, CT
- Posts
- 2,153
Thanked: 586
Alternative Materials
I mentioned earlier that the inlay material can be something other than turquoise. If it can be ground into dust or fractured or crushed or pulverized and mixed into a paste with epoxy, it can likely be used to fill inlays. Think about exotic hardwoods like ebony, purple heart, cocobolo, yellow heart, etc.

How about crushed sea shells? There are many colors on Natures palette. You can find pure white, brilliant red in coral, purple paua shells.
You cant beat some of the harmonious contrasts in the color combinations available very cheap or for free!

And it is easy to grind various metals and use the filings just like the turquoise dust. In the above photo there is brass, 99.999% sterling silver and 14kt gold.
I hope I have put out enough info to interest and inform you folks. Any questions? I will always try to help you succeed.
Have fun,
Brad
-
The Following 11 Users Say Thank You to icedog For This Useful Post:
-
06-19-2009, 05:59 AM #4Usagi Yojimbo


- Join Date
- Jan 2007
- Location
- Ramona California
- Posts
- 6,858
Thanked: 792
I believe I have said this before but it bears repeating!
You are quite the craftsman Brad and have an artists soul!
-
The Following User Says Thank You to JMS For This Useful Post:
icedog (06-19-2009)
-
06-19-2009, 09:34 AM #5< Banned User >
- Join Date
- Apr 2008
- Location
- Newtown, CT
- Posts
- 2,153
Thanked: 586
Holy crap Mark, what a generous comment! Assuming you mean "I have an artist's soul." The immortal soul of which artist do you believe I have siezed and am successfully maintaining physical control of? Goya? Dali perhaps? Please tell men you believe I have finally captured the soul of Harvey R. Ball! Oh wow Mark thank you! Harvey Ball. Oh what I wouldn't do for Harvey Ball's soul! Originally Posted by JMS


-
06-19-2009, 10:09 AM #6Beard growth challenged
- Join Date
- Feb 2009
- Location
- Berlin
- Posts
- 1,928
Thanked: 402
Unbelievable beautiful. You have a great taste!
-
The Following User Says Thank You to 0livia For This Useful Post:
icedog (06-19-2009)
-
06-19-2009, 10:17 AM #7The Great & Powerful Oz


- Join Date
- May 2008
- Location
- Bodalla, NSW
- Posts
- 15,596
Thanked: 3748
Thanx Brad . That's a great tutorial & concept.
 The white gleam of swords, not the black ink of books, clears doubts and uncertainties and bleak outlooks.
-
The Following User Says Thank You to onimaru55 For This Useful Post:
icedog (06-19-2009)
-
06-19-2009, 11:44 AM #8what Dad calls me


- Join Date
- Feb 2008
- Location
- Kansas city area USA
- Posts
- 9,172
Thanked: 1677
Brad, thank you so very much. I would have never guessed that it could be so simple.
It is easier to fool people than to convince them they have been fooled. Twain
-
06-19-2009, 11:58 AM #9< Banned User >
- Join Date
- Apr 2008
- Location
- Newtown, CT
- Posts
- 2,153
Thanked: 586
Don't guess, do! Originally Posted by nun2sharp
-
06-19-2009, 02:07 PM #10
Wow...
Wow.
-
The Following User Says Thank You to JimR For This Useful Post:
icedog (06-19-2009)


 Reply With Quote
