
Results 21 to 30 of 85
 99Likes
 LinkBack URL
 About LinkBacks
-
11-22-2015, 06:43 PM #21Senior Member


- Join Date
- Dec 2014
- Location
- Southern NH
- Posts
- 562
Thanked: 41 There's no frown, but instead, quite a taper on the heel and toe, probably the last 5/8-3/4". So much at the toe, that my honing doesn't seem to touch it much at all (see earlier close ups of toe, and shots of the curve on the edge). The link Euclid440 mentioned, suggested an approach to make a smile that matched the curve on the spine, as one option to straightening the edge. I didn't think the mention was to the quality of the edge, as I read it. The implication was that I need to do some work on the shape, before getting to the bevel setting, as I understand it (but may be misunderstanding).
 Originally Posted by jfk742

I'm pretty much done cleaning the edge, and am now wondering which way (straighten or smile), and how to best attempt that, given what I have for tools at hand.Regards,
PCM
-
11-22-2015, 06:46 PM #22Senior Member


- Join Date
- Apr 2012
- Location
- Diamond Bar, CA
- Posts
- 6,553
Thanked: 3215
It looked to me like it had a couple dips in the edge. Ink the edge, lightly bread knife it on the face of any stone just 1 or 2 strokes and look at the edge. Where ink remains on the edge are the low spots.
A file will not make a dent in the edge, you need a Diamond file or Diamond plate or low grit stone.
Once you mark your profile with a sharpie, you can with the spine on the counter, edge up use the DMT to lightly file to the profile line, just get close. Or lightly drag the razor 90 degrees to the diamond plate with the plate on the counter. Either way, go slow and use lite pressure the edge is thin.
Once you are close to the line, do the same thing on the back of your 1k to smooth the profile, again get close. Honing will do the final finish.
Sandpaper will work also.
Look up the “Make me Smile” thread in the Workshop Forum, for a how to.
-
The Following User Says Thank You to Euclid440 For This Useful Post:
pcm (11-22-2015)
-
11-23-2015, 01:37 AM #23Senior Member
- Join Date
- Dec 2014
- Location
- Southern NH
- Posts
- 562
Thanked: 41
Ok, I tried marking edge with sharpie and doing 1-2 strokes, but it was really hard to tell where the coverage was. Instead, I held the blade perpendicular to the back of the DMT plate, and I could see two low spots along with the tapers on the ends. Looks like you're right Euclid440 on the edge.
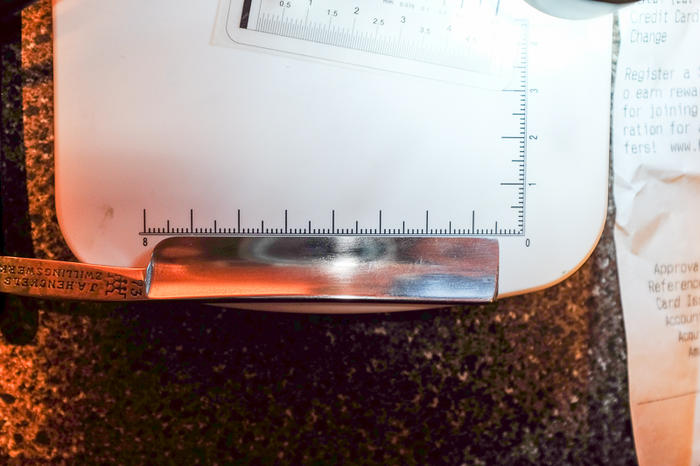
The caliper showed widths of 15.02mm, 15.06, 15.15, 14.80, 14.84, 14.81, 14.72, 14.68, sampled along the edge. Granted the spine is curved, so the measurements are relative.
I bread knifed the edge on the 220 grit stone and DMT, until it was as flat as I could tell, by looking for light coming through, along the edge. I was thinking of trying to do a smile, but I was struggling trying to mark the template into the blade, so I opted for a straight edge. I also took a penny and marked the heel, and tried rounding it more.
It's pretty dull now, I see no bevel. Looks like the toe is 0.4mm narrower, and the heel is 0.56mm narrower. The difference between toe and heel is 0.5mm now, versus 0.34mm before. Took me time to get rid of the low spots.
I'll post pictures later tonight to see what people say, before trying to do a bevel tomorrow or Tuesday.Euclid440 likes this.Regards,
PCM
-
11-23-2015, 02:21 AM #24Senior Member
- Join Date
- Dec 2014
- Location
- Southern NH
- Posts
- 562
Thanked: 41
Here are shots along the edge:
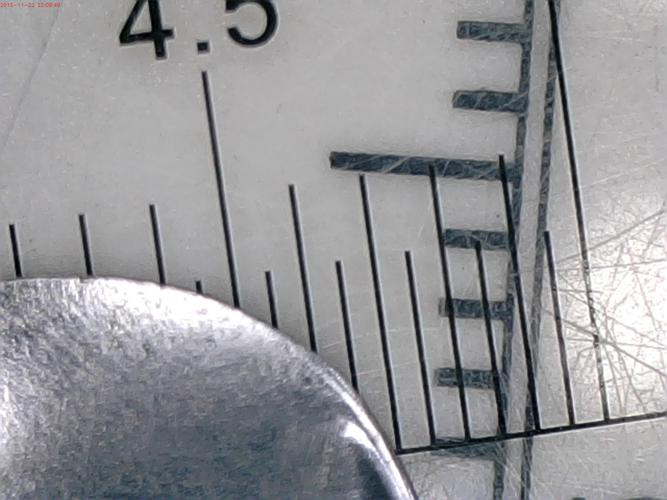
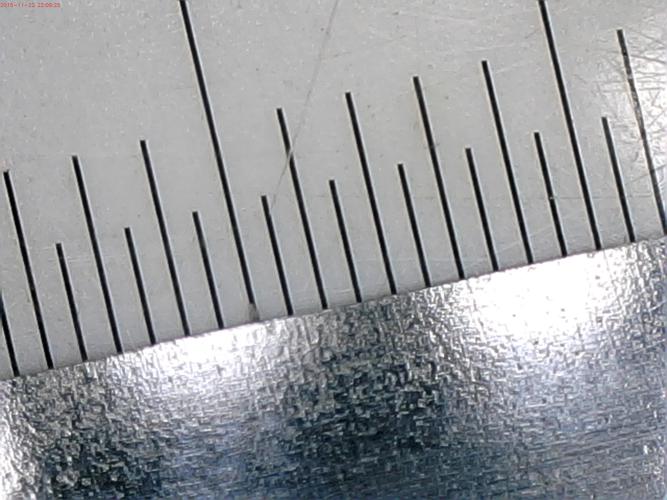
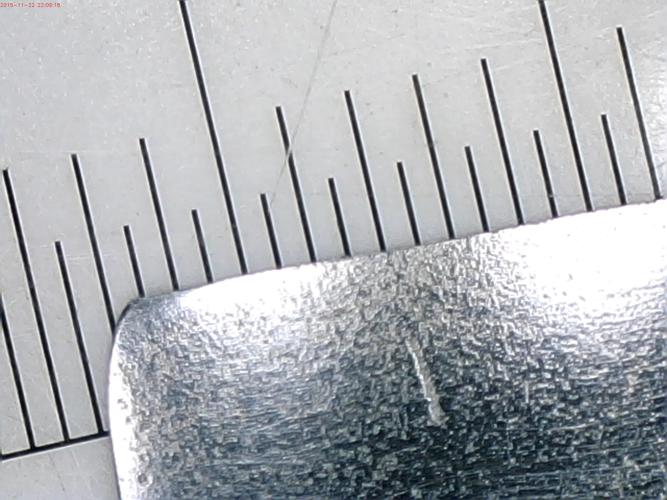
Here is a look along the edge with a guide. I didn't quite have it perfectly aligned with the guide line, but it gives a good view. There is no bevel now:
How does it look?Regards,
PCM
-
11-23-2015, 05:12 AM #25Senior Member
- Join Date
- Apr 2012
- Location
- Diamond Bar, CA
- Posts
- 6,553
Thanked: 3215
Lots better.
Nice work on the heel. All of this is repair and must be done before you hone.
Now honing, will still not be a regular honing, so take your time, it is repair honing and you will have to set a bevel where none exist.
You can hold the razor at about 45 degrees spine off the stone, drag the edge across the stone, do about 10 laps then look at the bevel to see how close they are to meeting. Keep doing sets of 10 until the bevels get close to meeting. This will save you a lot of laps on the 1K, by knocking off the corners and starting a bevel. Do not get them to meet, leave a couple thousands on the edge,
Put 2 layers of tape on the spine and stay on the 1k, until you fully set the bevel. Check your tape often and re-tape as soon as you burn through, if you feel it get gummy, stop and re-tape. Start honing by doing circles until the bevels come together, then switch to X strokes.strangedata likes this.
-
-
11-23-2015, 11:57 AM #26Senior Member
- Join Date
- Dec 2014
- Location
- Southern NH
- Posts
- 562
Thanked: 41
Thanks! I was very pleased by the results (hoping you were too Originally Posted by Euclid440

On the first part, with the razor at a 45 degree angle from the stone, should I do that on the DMT?
I greatly appreciate all the pointers!Regards,
PCM
-
11-23-2015, 04:05 PM #27Senior Member
- Join Date
- Apr 2012
- Location
- Diamond Bar, CA
- Posts
- 6,553
Thanked: 3215
No, 1k.
The DMT will speed up metal removal, but the danger of causing chipping will eat up any time you save, repairing chipping at the higher end. It is just not worth the risk.
The metal is thin and the 1k will cut a new bevel just fine.strangedata likes this.
-
The Following User Says Thank You to Euclid440 For This Useful Post:
pcm (11-24-2015)
-
11-24-2015, 01:49 AM #28Tradesman


- Join Date
- Aug 2014
- Location
- Sault Sainte Marie
- Posts
- 1,719
Thanked: 245
Pcm you're getting some great help from Euclid. It also looks like you're following his advice and doing a great job. Keep us updated with the pictures and good luck!
-
The Following User Says Thank You to s0litarys0ldier For This Useful Post:
tonybee (05-10-2016)
-
11-24-2015, 04:43 AM #29Senior Member

- Join Date
- Oct 2008
- Location
- Munford TN
- Posts
- 436
Thanked: 46
I have seen this many times now on many razors that I have worked on. I was thought the best way to see it is take a flat dark colored hone and put it up to the light. As you roll the blade from heel to tip it should either be flat with no light showing. You will notice this a lot when you put it up to the light. Or if when you roll the heel to tip you notice that the edge rolls with no light showing where it makes contact with the hone. If you can lie it flat and no light is seen you can use just a standard x stroke. If you have to roll it from the tip to the heal and see no light a rolling x will help with this. Hopefully this makes sense
clmwxx likes this.
-
The Following User Says Thank You to jballs918 For This Useful Post:
pcm (11-24-2015)
-
11-24-2015, 01:33 PM #30Senior Member
- Join Date
- Dec 2014
- Location
- Southern NH
- Posts
- 562
Thanked: 41
Yes, Euclid440 has been wonderful, giving great suggestions and advice. I hope to work on it more today or tomorrow. Bevel set is next step. Originally Posted by S0LITARYS0LDIER
Regards,
PCM


 Reply With Quote