
Results 1 to 10 of 15
 3Likes
 LinkBack URL
 About LinkBacks
-
07-31-2012, 02:00 AM #1Senior Master Tinker


- Join Date
- Jul 2012
- Location
- Deland, Florida
- Posts
- 233
Thanked: 81 Need help with a frown in a blade
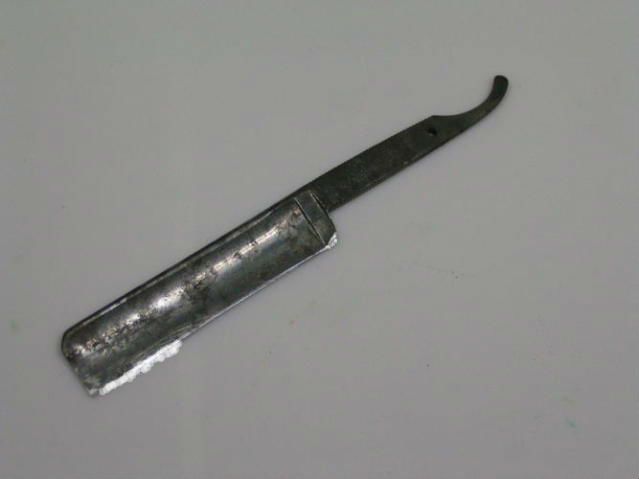
I need help with a wicked frown in a blade. I don't want to ask for a rehash of what has already been posted but just a link to forum, Wiki or Workshop posts that have already been created. I have read most articles on the Wiki and the Workshop and have spent days researching in the forums and have found nothing. Obviously, I am not inputting the correct terms to find what I am looking for. Any and all help and directions to where I should look would be greatly appreciated.
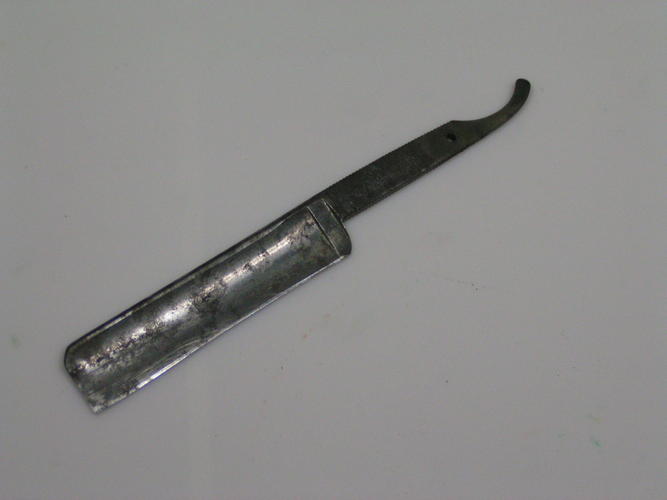
RandyLast edited by WhiteLion; 07-31-2012 at 02:04 PM. Reason: added picture
-
07-31-2012, 02:30 AM #2I shave with a spoon on a stick.


- Join Date
- Jan 2009
- Location
- Stay away stalker!
- Posts
- 4,578
- Blog Entries
- 1
Thanked: 1262
You have to turn that frown upside down. Or at least make it a smirk
Last edited by Slartibartfast; 07-31-2012 at 11:53 AM.
-
07-31-2012, 03:32 AM #3Senior Member


- Join Date
- Feb 2008
- Posts
- 32,564
Thanked: 11042
A photo would be very helpful to members wishing to offer advice on your problem blade.
-
07-31-2012, 02:53 PM #4Learning something all the time...


- Join Date
- Jul 2012
- Location
- Central Missouri
- Posts
- 1,690
Thanked: 247
I think I may have the same model razor LOL. Is that a Hunter by any chance?
Fair warning: I know next to nothing about straight honing other than what I have learned from reading here and other forums in the past month or so. As I said, I had one similar to what you have there and I opted to fix it myself in much the same way I have repaired many fine knives...by grinding away precious metal to restore the edge shape. In your case I would grind primarily at the toe because it appears that is where the blade has the tallest profile. I would use calipers to monitor the progress and seek to balance the blade profile (spine to edge measurement)...and I would expect this to take *me* a few hours on hand hones
I will be interested to see what suggestions come up here.
-
The Following User Says Thank You to unit For This Useful Post:
WhiteLion (08-08-2012)
-
07-31-2012, 03:00 PM #5Senior Member
- Join Date
- Feb 2008
- Posts
- 32,564
Thanked: 11042
With something like that, it ain't too bad, I would hone the edge like a pocket knife with the spine off of the hone maybe 10 degrees. Get the profile to where you want it and then put some electrical tape on the spine and do circles to get a correct bevel. Replace the tape as it wears through. It is time consuming work and TBH if it were my blade I would scrap it. If you just want to do it for the challenge that is cool too. Lot of work though. Whatever you do, don't breadknife it. IME that creates as many problems as it solves. It seems like a shortcut but it really is not.
ScottGoodman and Theseus like this.
-
The Following User Says Thank You to JimmyHAD For This Useful Post:
unit (07-31-2012)
-
07-31-2012, 03:38 PM #6At this point in time...


- Join Date
- Jun 2007
- Location
- North Idaho Redoubt
- Posts
- 26,961
- Blog Entries
- 1
Thanked: 13226
You have to fix the edge profile and then you also have to re-contour the heel... This is NOT honing this is restoration, and there is a bit of difference between the two..
You have to remove the metal to even it up, once that is done, then you can begin to hone.. I agree with Jimmy although I would probably take it a bit higher in angle to start probably closer to 45°.. I am also reluctant to use the term "Breadknife" because it is often thought to only mean a 90° angle but it is actually the honing motion, and yes I would use that motion at a lower angle to correct the blade profile, then drop to a 20° with circles and finally either 1 layer of tape or none to complete the honing..
I tried the new photo editor but honestly I am just not so good at using it
All that being said this is really not an easy fix it requires you to remove quite a bit of metal and if you are not really comfortable with honing then I really suggest you set this aside and tackle easier projects first..
Edit: Also, while messing with the photo editor I noted if you look close at the spine you can see the wear is rather uneven, so I might recommend leaving one layer of tape on for the honing it will probably make life straighter (pun intended)
Last edited by gssixgun; 07-31-2012 at 03:41 PM.
cudarunner likes this.
-
The Following 3 Users Say Thank You to gssixgun For This Useful Post:
cudarunner (07-31-2012), unit (07-31-2012), WhiteLion (08-01-2012)
-
07-31-2012, 04:13 PM #7Senior Master Tinker
- Join Date
- Jul 2012
- Location
- Deland, Florida
- Posts
- 233
Thanked: 81
unit: The blade is a Kabeso 186.
Jimmy & Glen: Messing around with the razor is intended as a learning experience in many facets of the hobby. And Glen, you are correct, there is a lot of spine wear and unevenness. What grit are you thinking to start with (250, 600, 1000)? Also, do I start by just honing the toe where the worst of the frown is or do I work on the entire blade expecting the the frown will remain above the honing surface until the frown is removed.
Thanks for all your input. I do have several other projects in the works and this blade will only be a filler for times when I am waiting for another process to complete. I've already learned one valuable lesson with this Kabeso: when applying a heat gun to bakelite scales to fix warping, do NOT let your attention wonder!!! They melt like ice cream on a hot summer day if your mind doesn't stay focused.
-
The Following User Says Thank You to WhiteLion For This Useful Post:
unit (07-31-2012)
-
07-31-2012, 08:41 PM #8Beginner

- Join Date
- Dec 2010
- Location
- Tennessee
- Posts
- 82
Thanked: 28
watch this video and the other two parts of it, generously made by Gssixgun, it covers basically what you need to do except as Glen(gssixgun) pointed out above, start at a 45degree angle instead of straight up and downOur name is Equality 7 - 2521


 Reply With Quote
The Following User Says Thank You to recurvist22 For This Useful Post:
WhiteLion (08-08-2012)
08-01-2012, 01:36 AM
#9
- Join Date
- Jul 2012
- Location
- Deland, Florida
- Posts
- 233
Thanked: 81
Thank you recurvist22. That is exactly what I was looking for. I had found references to it in other posts I had read but was unable to track it down.
08-01-2012, 07:19 AM
#10
- Join Date
- Mar 2007
- Posts
- 608
Thanked: 124
On something like that I'd start with either a really coarse hone or sandpaper. I personally find that about 45 degrees and a drawing stroke answer pretty well for evening out the edge.
