
Results 1,731 to 1,740 of 20508
 91297Likes
Thread: What are you working on?
 LinkBack URL
 About LinkBacks
-
01-29-2016, 03:45 AM #1731Senior Member


- Join Date
- Mar 2015
- Location
- Akron, Ohio
- Posts
- 11,948
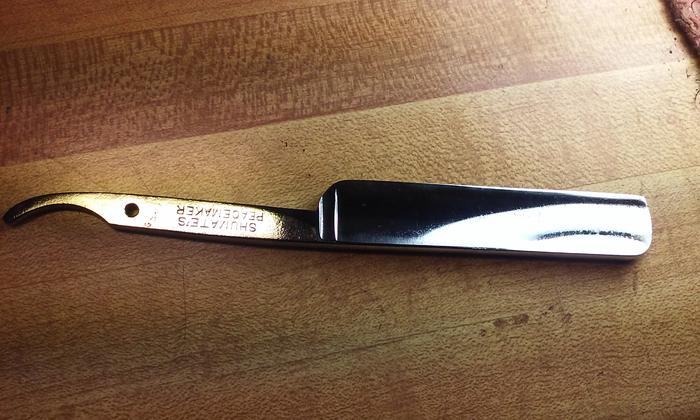
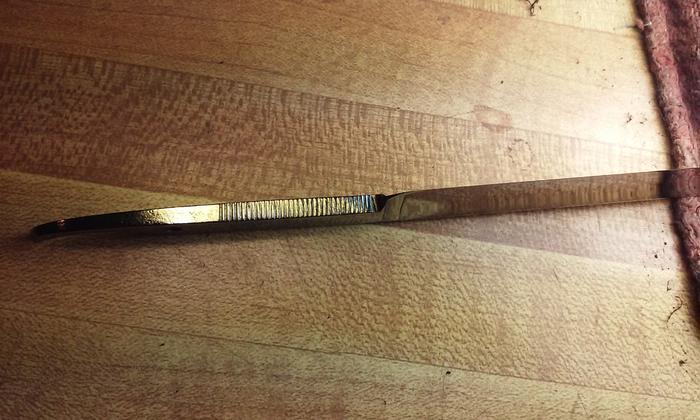
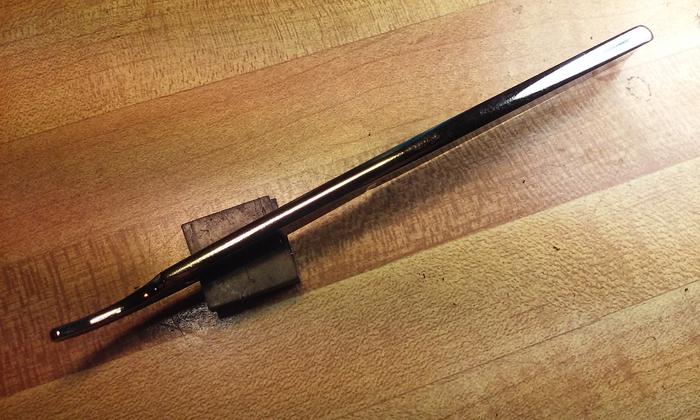
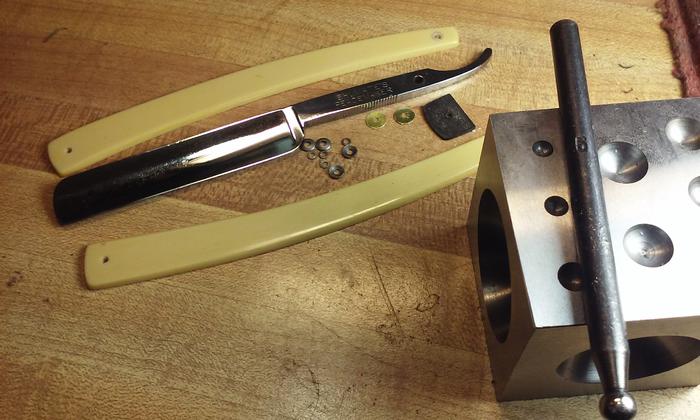
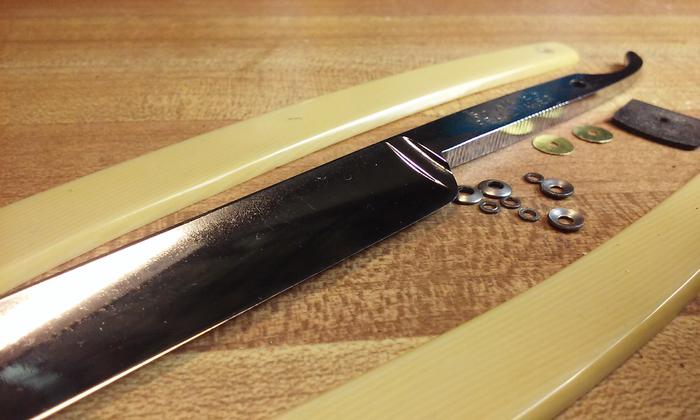
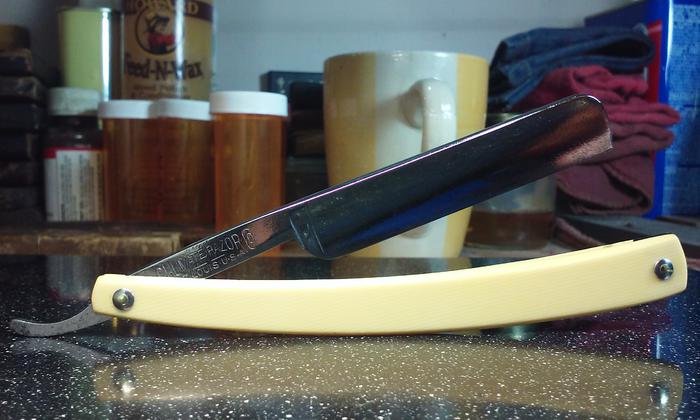
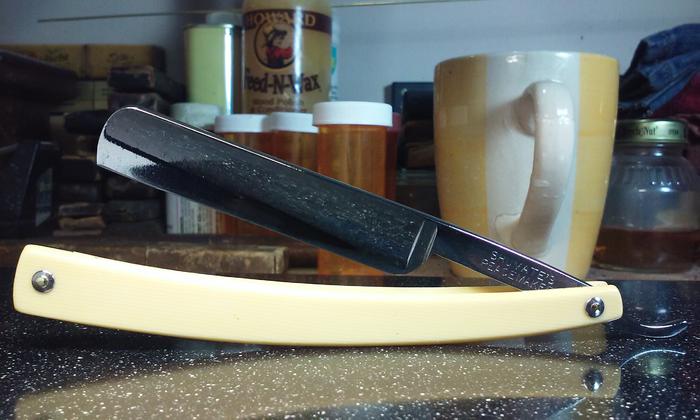
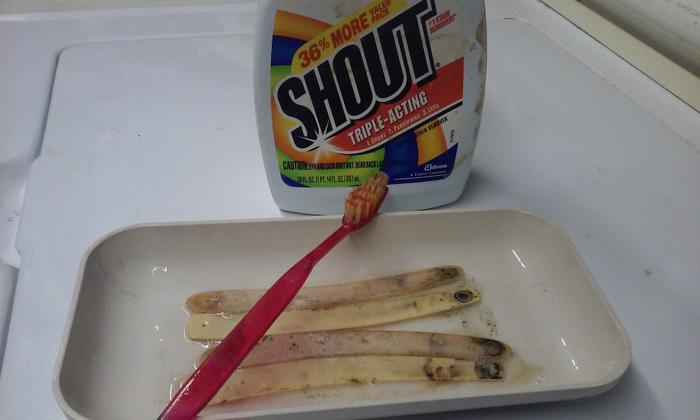
Thanked: 4300 The Shumate is back together, pinned with brass rod, under washers, and stainless washers that I domed with my doming block from China Frieght.
 Originally Posted by outback

Polished them with the dremmel, after it was pinned.
 Mike
Mike
-
01-29-2016, 05:00 AM #1732
Lookin' good Mike! I love it as always!!!!!!
-
The Following User Says Thank You to engine46 For This Useful Post:
outback (01-29-2016)
-
01-30-2016, 12:00 AM #1733Senior Member


- Join Date
- Dec 2014
- Location
- Virginia, USA
- Posts
- 2,224
Thanked: 481
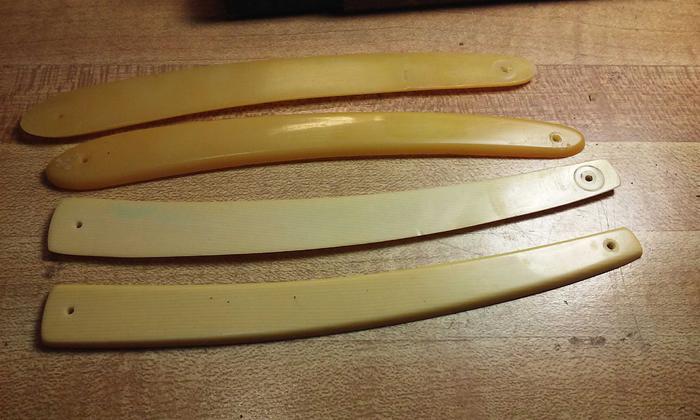
Top to bottom: JR Torrey, Germania Cutlery Works, and a Wedge.
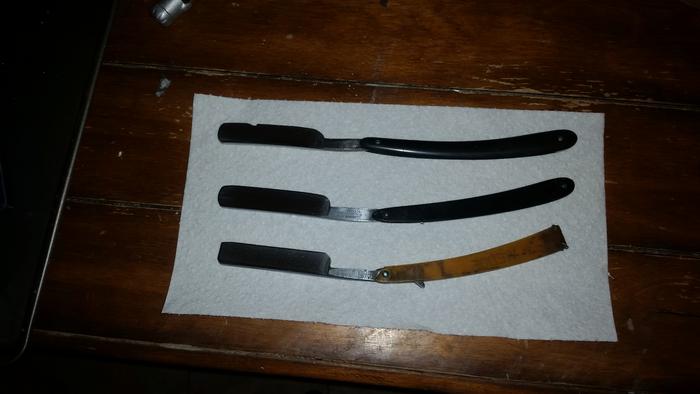
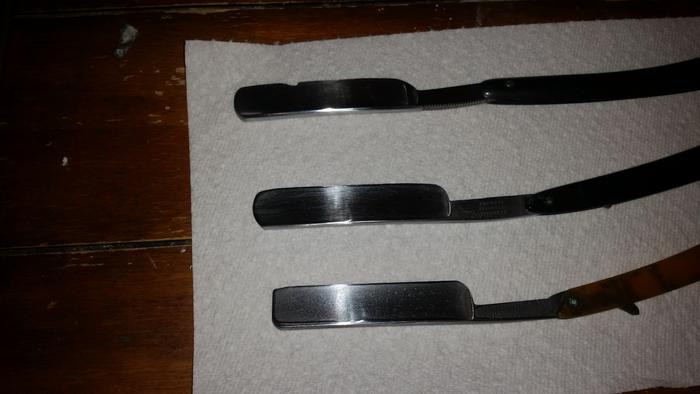
Sort of did it backwards and polished them to 2k first, but the Torrey has a Crack just behind that large chip. I wanted to be sure it could handle the rigors of being polished before moving forward hogging out steel to work away the chip. Figured I'd hit the others while I was at it to get rid of some pretty gnarly rust spot they were sporting.
Now the fun begins! Prepping/shaping the edges (because they all need it to some degree). Might have the GCW bevel set before the night's over. Probably won't be so lucky with the rest lol. I was really hoping the chip would be the worst of It on the Torrey so I could just take it to the grinder. Don't want to risk it with that Crack though. Going to wear out a hone or 2 trying to save that one...lol
-
01-30-2016, 03:50 AM #1734Senior Member
- Join Date
- Dec 2014
- Location
- Virginia, USA
- Posts
- 2,224
Thanked: 481
Same razors, same order almost 4 hours later (took one for dinner) :
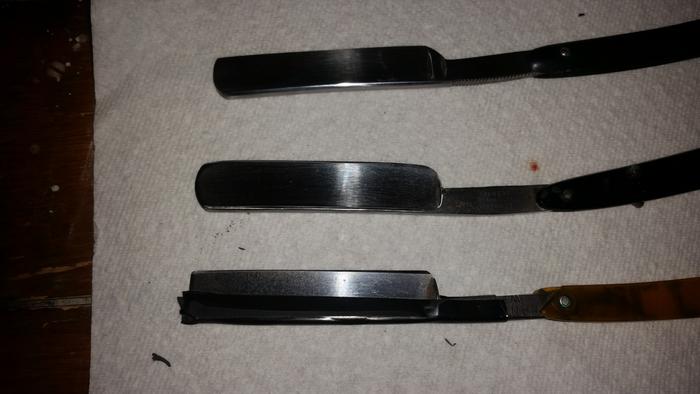
The Torrey hardly looks like the same razor! I was surprised how fast the steel wore away when I dug into it. Credit goes to the coarse side of a harware store hone of unknown manufacture or origin.
The wedge is fighting like h3!!, but I will get that bevel set! The toe doesn't want to come together, but it's close. This thing has some serious spine wear. 2 layers of tape and the bevel is all kinds of wonky. Might need to stop and look at spine correction before moving on...
The GCW currently has a double bevel on one side. Almost like whoever honed it last used tape on one side of the razor . As anticipated, this will be the easiest of the 3 to deal with, but it's thrown me a bit of a curve ball as well...
Tomorrow is another day!
-
01-30-2016, 02:06 PM #1735Str8Faced Gent.


- Join Date
- Aug 2013
- Location
- Orangeville, Ontario
- Posts
- 8,389
- Blog Entries
- 1
Thanked: 4200
Packing up a few items destined for friends as I prepare to jump into a side bar project.
I blame steve for putting this idea in my head but there are folk out there that converted old CD burner units from computers into small laser etching machines.
Well, I have a stack of old pcs and parts in the basement and just enough curiosity to break things down so long story short, I'm trying to build an inlay etcher.
Won't have the power to dig very deep, but may lay down a track I can follow with scrimshaw tools and such. The key will be the anduino board and interface I can find open source.
Will advise as the parts come in on any success, or flaming failures that result.
 "Depression is just anger,, without the enthusiasm."
Steven Wright
https://mobro.co/michaelbolton65?mc=5
-
01-30-2016, 02:16 PM #1736I love Burls....... and Acrylic

- Join Date
- Mar 2012
- Location
- Baden, Ontario
- Posts
- 5,475
Thanked: 2284
Sounds like a cool project Mike. I'm just impressed you even know how to do this.
Burls, Girls, and all things that Swirl....
-
01-30-2016, 02:35 PM #1737Senior Member

- Join Date
- Apr 2015
- Location
- Illinois
- Posts
- 282
Thanked: 89
Always cool/weird experiments going on in the B52 basement! What's next, secretly acquired body parts for assembly! Originally Posted by MikeB52

Gonna warn the neighbors to keep an eye out for very large lightning rods on your roof!
Sounds like a really interesting project! Good luck and remember, Safety First when working with lasers!!! We need the B52 eyeballs to keep all these cool projects going!
-
01-30-2016, 02:53 PM #1738Str8Faced Gent.
- Join Date
- Aug 2013
- Location
- Orangeville, Ontario
- Posts
- 8,389
- Blog Entries
- 1
Thanked: 4200
I don't,,, yet. Hehe. Originally Posted by HARRYWALLY
Instructables.com and hackaday.com are my teachers. I am pretty savvy with X,Y axis controls and servo/stepper motor drives. The rest, hopefully, is pretty straight forward rob, pilfer, and resolder..
I bought a handheld green laser years ago that can burn CD cases and light matches. Bit of a pyro, I suppose. Anyway, this should be that, only more precise. Least, that's the theory..
 "Depression is just anger,, without the enthusiasm."
Steven Wright
https://mobro.co/michaelbolton65?mc=5
-
01-30-2016, 02:56 PM #1739Razor Vulture

- Join Date
- Oct 2010
- Location
- Lone Star State
- Posts
- 25,876
Thanked: 8588
Sort of like that 'Jacob's Ladder'? Get someone to hold your beer so you can get a good job of it!
"Don't be stubborn. You are missing out."
I rest my case.
-
01-30-2016, 10:30 PM #1740
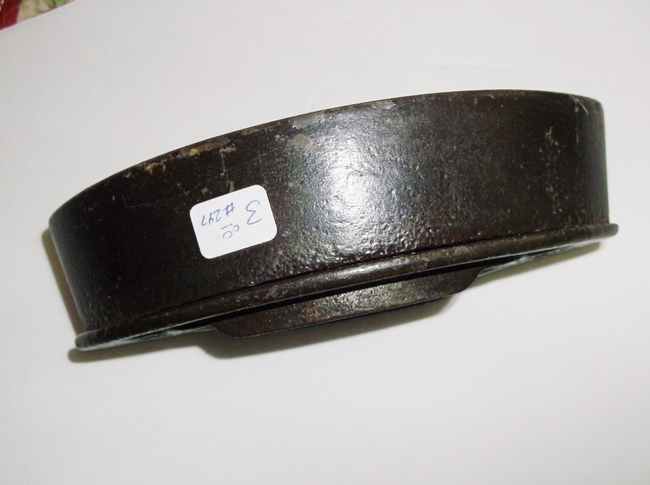
Sad Iron Anvil
Been a while since I were in the shop. This project has been on my mind for a while.
Starting with a cheap two piece Sad Iron base. It weighs about two+ pounds. Side and top view:
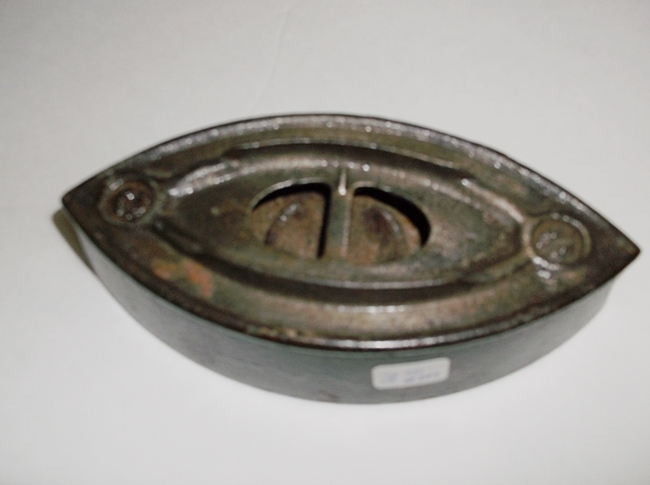
Drill out the screws/screw holes to within abut ¼" of the top( Ironing surface.)
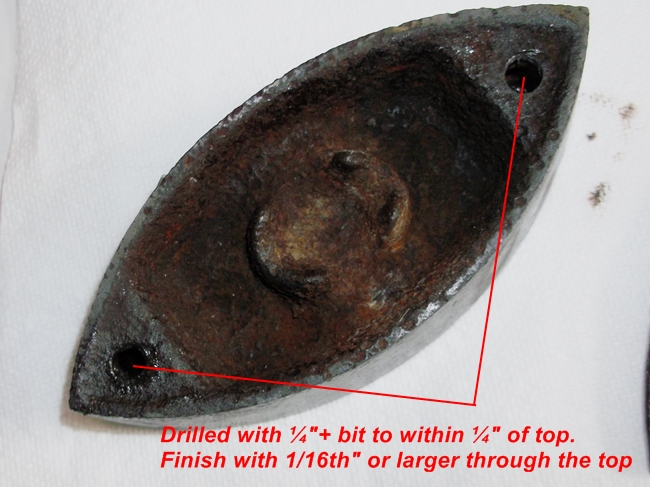
Here is the ironing and Anvil surface drilled through with 1/16th inch bit.
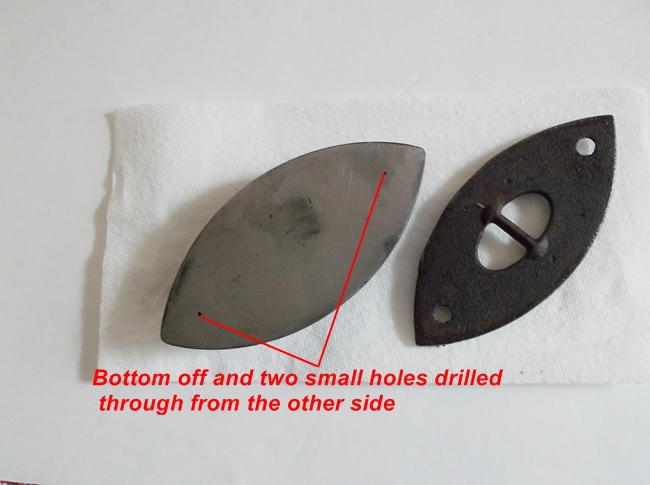
Not finished but you get the idea. The old iron is hard as can be and the $3 price was worth the time.
Sand and finish the surface and open the holes to whatever diameter you wish for un-pinning. The larger diameter holes are to give the pins a place to go when punched out. A rubber bottom attached would be a good idea after the top is drilled
Enjoy!
~RichardLast edited by Geezer; 01-30-2016 at 10:32 PM. Reason: Added better wording?
Be yourself; everyone else is already taken.
- Oscar Wilde
-
The Following User Says Thank You to Geezer For This Useful Post:
ejmolitor37 (01-31-2016)


 Reply With Quote

